 BigBlueButton (BBB) is a synchronous web conferencing tool that allows instructors and TAs to host live online presentations, seminars, office hours, or other meetings from cuLearn. BigBlueButton is easy to use and fully supported at Carleton University. It is simple to set up a session, load a presentation, answer questions, and record the session.
Watch the BigBlueButton Video Tutorials to see if BigBlueButton would suit your needs. If you are interested in using BBB in your course, and want assistance, contact the Educational Technology Team at the EDC by phone at extension 4433 or by email at edtech@carleton.ca
How to Use and Setup BigBlueButton
Click the links in the bulleted list below to learn how to use and set up BigBlueButton in your course.
- Adding a BBB session to your course
- Adding a Recording link to your session (you must do this if you want access to the recordings)
- Configuring your computer for BigBlueButton
- Managing your session
- Sharing your desktop
- Uploading a presentation
- Using polls in BBB
- Annotating a presentation
- Navigating the presentation
- Using Shortcut keys in your presentation
- Changing the presentation layout
- Student support and best practices
- Video tutorials for BigBlueButton
Adding a BigBlueButton Session to Your cuLearn Course
When you add a BBB session to your course page, you are adding a virtual web conferencing space where the course community can meet. The BBB session can be recorded or unrecorded based your needs.
- Login to your cuLearn course page
- Click Turn editing on. This button is located in the top right corner of your course page.
- Scroll to the section where you’d like to add the BBB session
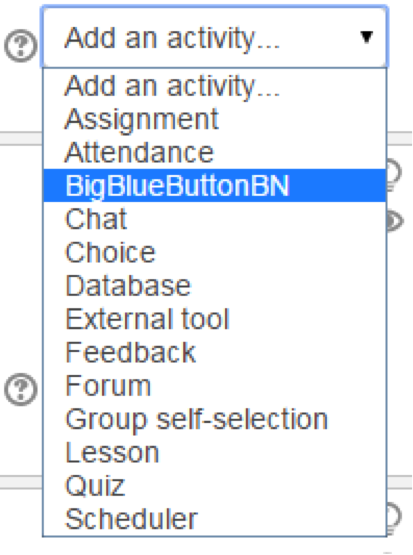
- Select BigBlueButtonBN from the Add an activity drop down menu. See the screen shot below for a visual of the Add an activity menu window.
- Type in a Virtual classroom name for your BBB session
- Click Save and return to course.
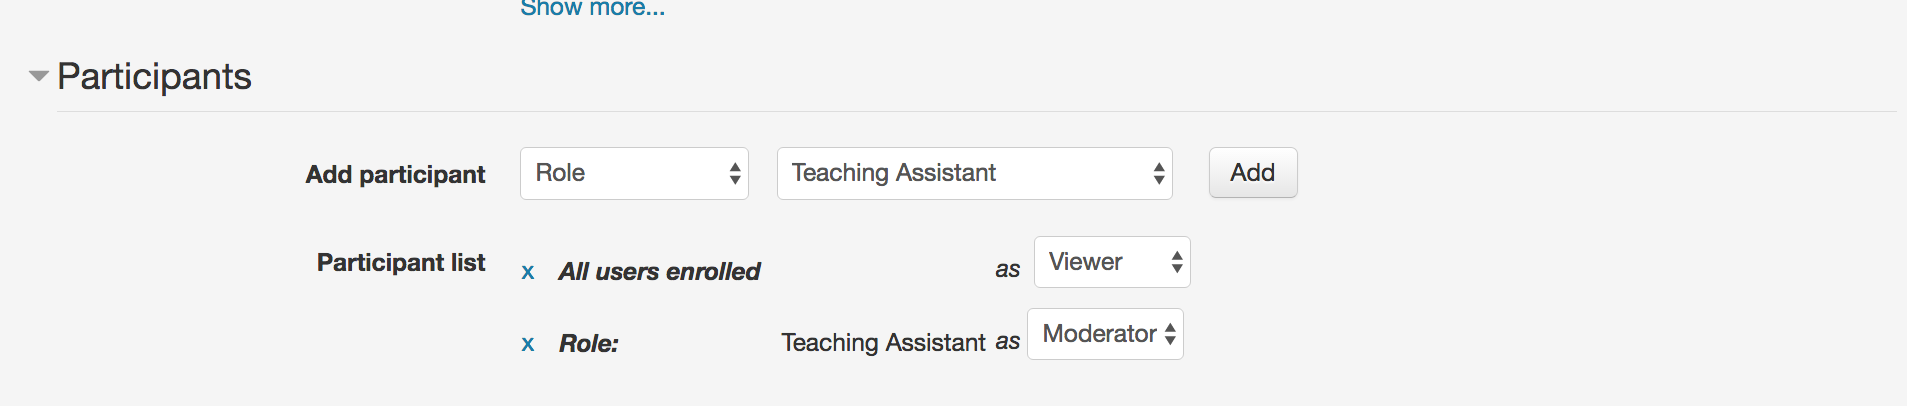
- Choose the preferred settings associated with this room. Some key settings include setting the moderator, scheduling the session dates, and making the session visible. The screen shot below shows a portion of the BBB settings window where participant roles can be selected and assigned.
- Click Save and return to course. You should now have a virtual BigBlueButtonBN room setup in your course.
Adding a Recording Link to Your Session in cuLearn
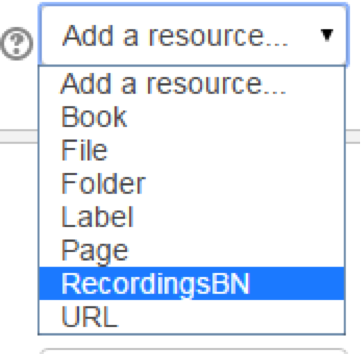
If you want a recording of your session (even if you don’t plan to share it with students), you need to set up a recording link for your class before the session. The RecordingsBN resource will enable you to record your session. See the screen shot below for a visual of the Add a resource menu with the RecordingsBN resource selected.
To add a recording link to your BBB session from within your cuLearn page
- Click Turn editing on
- Click Add a Resource to access the drop down menu.
- Select RecordingsBN from the menu.
- Type in a Recordings name.
- Click Save and return to course. Your BBB session can now be recorded.
Configuring Your Computer for BigBlueButton
Once a BBB session is set up in your course, you can launch it by clicking the name of the BBB session you set up. When you launch the BBB session, you will be asked to configure your audio and microphone settings for the session.
To configure your audio and microphone settings for BBB:
- Click Join Session.
- Choose whether to participate by using a microphone or to listen only
- Select the microphone you will be using from the drop down menu
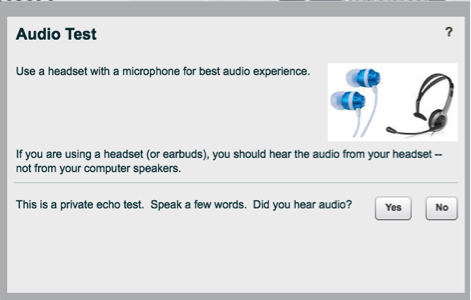
- Test your audio by speaking a few words and listening for the sound of your voice in your headset. See the screen shot below for a visual of the audio test window.
- Click Yes if the audio test has been successful (i.e. you were able to hear yourself speak through the headset speakers). See the screen image below for a visual of the Audio Test window. If your audio test was not successful, check that you have selected the appropriate microphone, and check that your microphone is plugged in correctly.
NOTE: You want to make sure that your students perform an audio test as well. Testing the microphone and audio ensures that you and your students have working equipment that allows participation in the BBB session. Watch the video for more information about setting up audio.
TIP: It is preferable for students to join the session with headphones/microphones as this allows students to participate fully in the session; however, users can phone-in to access audio portion of the BBB session if they are unable to connect online. BBB will display a phone number for dial-in access to the session. See the screen shot below for the message you will see regarding dial-in phone access for participants. If students call in to the session, they will be able to hear the session and participate orally in the session, but they will not be able to see what is on the screen or in the chat windows.
Managing Your Session
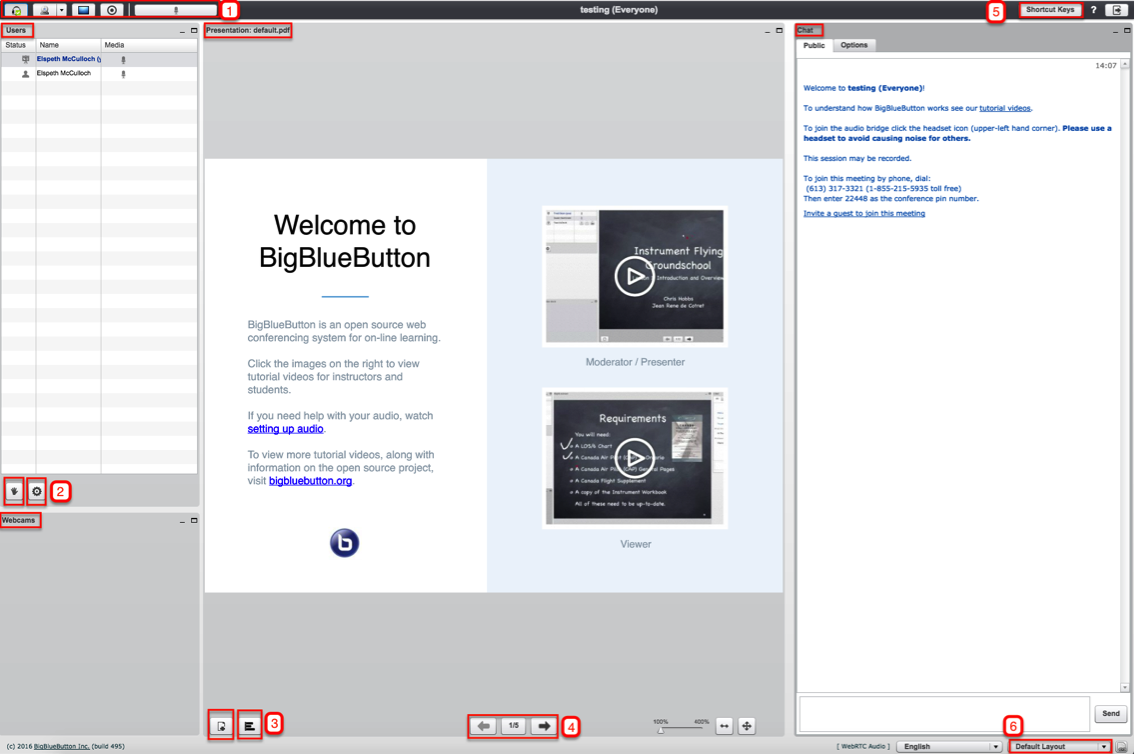
The screen shot below provides a visual of the BBB default session layout. Each area of the BBB default session layout is labelled with a number that is explained in more detail below.
- The Audio, Video, and Recording control toolbar is at the top left-hand side of the BBB default layout screen. See the screen shot below for a close up image of the toolbar.

This image is a screen shot with a close up image of the Audio and Video tool bar in BBB.
The buttons on the tool bar perform the functions indicated in the list below (matching the toolbar buttons from left to right):
- Audio button: Use this button to mute and unmute your headphone’s microphone during the BBB session. This button turns audio input on and off.
- Video button: Use this button to control the BBB video recording. This button turns video on and off.
- Desktop Sharing button: Use this button to broadcast your desktop for all users to see.
NOTE: Sharing your desktop requires the user to have the latest version of Java. For more information, watch video on how to share your screen during a presentation.
- Recording button: Use this button to record your BBB session.
- Microphone button: Use this button to turn any external microphone on and off during the BBB recording.
NOTE: You must set up the recording link in your class before turning on the recording. Instructions are above in the section called “Adding a Recording Link to a Session”.
2. The Participation toolbar is at the bottom of the users window. See the screen shot close up below for a visual of the two buttons found in Participation toolbar.
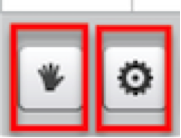
The buttons on the toolbar perform the functions indicated in the list below (matching the toolbar buttons from left to right):
- The Hand button allows users to raise their hands, vote, and express emotions via emojis.
- The Gear button can be used to clear a user’s status, to mute an individual or all participants, to lock viewers or to create breakout rooms. For more information about how to create and manage breakout sessions, watch this video tutorial.
3. The Presentation toolbar is at the bottom of the Presentation window. See the screen shot close up for a visual of the two buttons found in the Presentation toolbar.
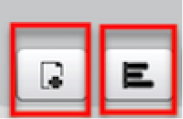
The buttons on the toolbar perform the functions indicated in the list below (matching the toolbar buttons from left to right):
- The Add Page button allows you to upload a document to the BBB session. Document formats can include Word, PowerPoint, and PDF.
- To add a document or presentation to your BBB session
-
- Click the Upload Presentation button at the bottom of the screen.
- Browse to find your presentation and click upload. Your presentation will load and present itself in this window. Once you’ve loaded your presentation, the box changes and provides more options. The title “presentation” changes to the title of your uploaded file.NOTE: Everything within the presentation box will be visible to students at once.The red dot is actually your mouse. Students will be able to follow your mouse by following the red dot. This enables you to direct their attention (e.g. point out key images). You may also use the zoom feature to narrow in on a particular image.
Using Polls in BBB
To create a poll in your BBB session
- Click the Graph button located at the bottom of the Presentation pod window.
- Select the type of poll you would like to use. You can use preset poll types, such as true/false or 4 answer multiple choice polls, or you can create a custom poll. See the screen shot for a visual of the poll type selection menu that appears when you click the graph button.
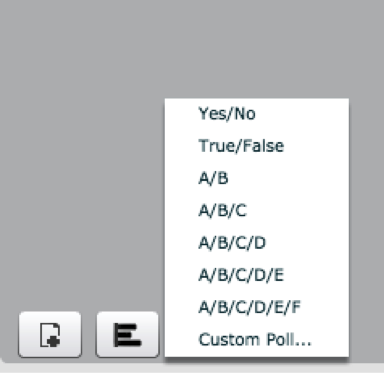
- Create your poll questions.
- Prompt participants to answer the poll.
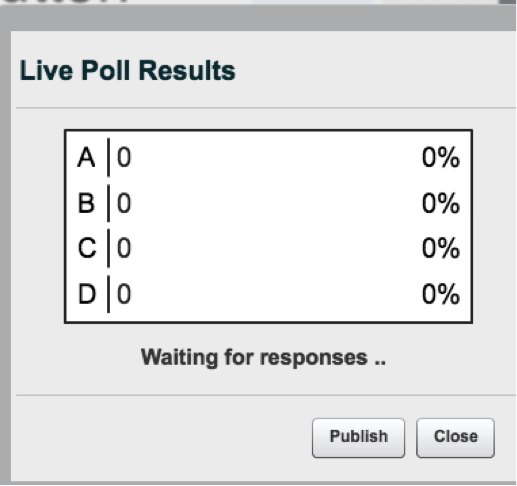
- When all or most participants have answered the poll, click Publish results and the poll totals will display in the session. See the screen shot for a visual of the Live Poll Results window with the Publish button.
Annotating a Presentation
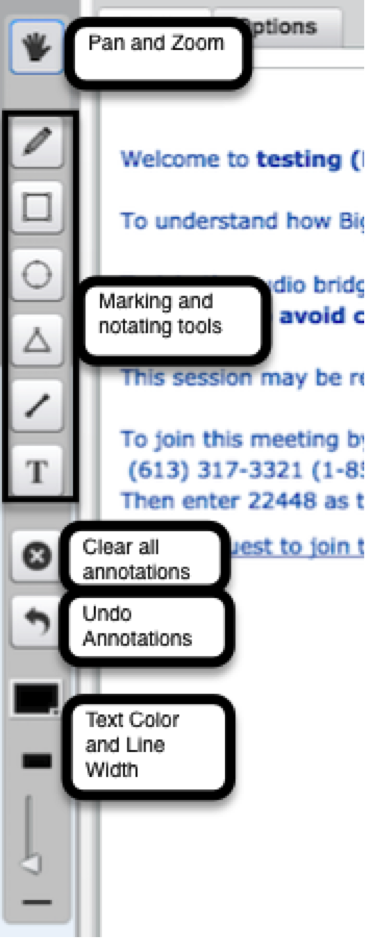
Annotation tools allow the moderator to highlight and annotate the presentation in the window. The annotation toolbar is visible in the Presenter view when the user puts their cursor over the presentation window.
NOTE: Only the session moderator is able to annotate the presentation. You can allow participants to annotate the presentation by changing their role in the session. See the screen shot below for a close up of the annotation tools with an explanation of each tool’s function.
Annotation tools and their functions are explained in the list below.
- The hand button allows the moderator to pan and zoom in the presentation.
- The pencil button, square icon button, circle icon button, triangle icon button, diagonal line icon button, and T icon button allow the moderator to mark and annotate the presentation.
- The circle with an x button it clears all the annotations added to the presentation.
- The backward arrow button is an undo button that removes the most recent annotation.
- The rectangular box icon allows the moderator to select a text and annotation colour.
- The smaller rectangular box icon allows the moderator to select different line widths for the annotations.
Navigating the Presentation
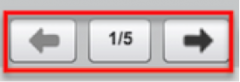
The presentation progress buttons at the bottom of the Presentation window allow the moderator to move through the presentation.
- The forward arrow advances the slides.
- The backward arrow moves the slides backward.
- The fraction button in the middle allows displays the current slide and total number of slides as a fraction. (See the screen shot below for a close up visual of these Presentation progress buttons.)
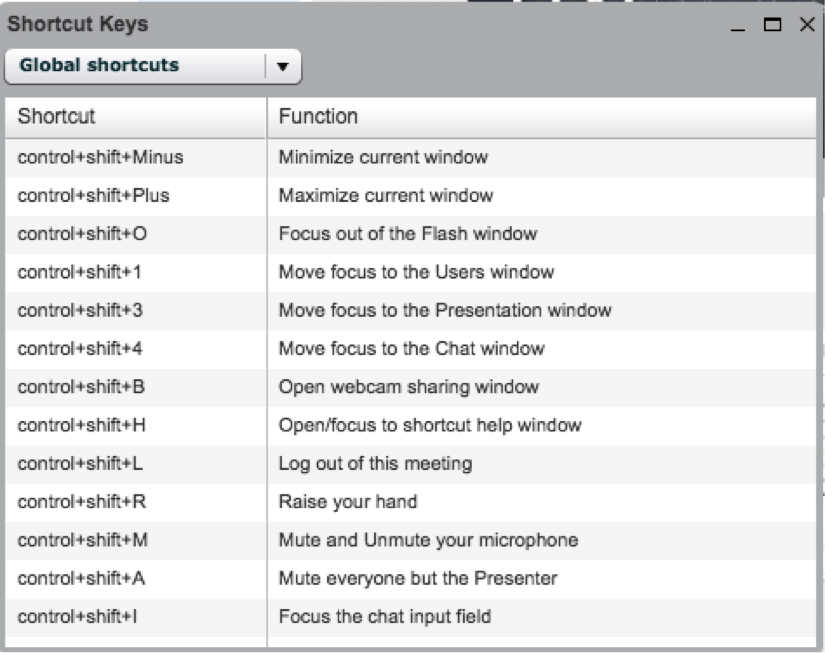
Using Shortcut Keys in Your Presentation
The Shortcut Keys button is located on the top right hand corner of the BBB window. See the screen shot below for a visual of he Shortcut Keys button.

When you click on the Shortcut Keys button, a table of shortcuts and their functions appears. These Shortcut Keys are tools that will help you manage your presentation more smoothly. See the screen shot below for a visual of the Shortcut Keys table and their functions.
Changing the Presentation Layout
Different presentation layouts are available for your BBB session. The layout options include
- Closed Captioning -Watch video on Closed Captioning
- Video Chat
- Webcam meeting
- Presentation meeting
- Lecture assistant
- Lecture
You can resize BigBlueButtonw windows by clicking and dragging the edges. You can move pods by dragging and dropping them.
The default layout includes the following windows:
- Users: This window displays all BBB participants. The status column indicates all users’ roles in the classroom. The instructor can change the presenter role by clicking the icon on the bottom and highlighting the user’s name.
- Webcams: This window displays video input from user webcams. Multiple users can share their webcam at the same time. There is no built-in limit on the number of simultaneously active webcams.
- Presentation and Whiteboard: This window displays presentations with a whiteboard feature. The whiteboard controls let you annotate key parts of your presentation.
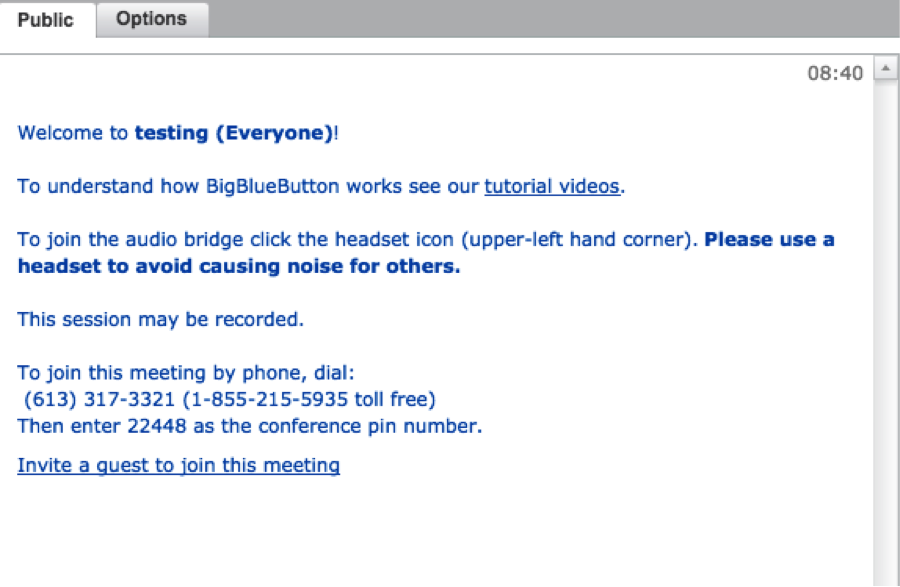
- Chat: This window enables text chatting between participants. The instructor can speak to all students or set up a private chat with a particular student. To chat with an individual student,
- Click on the Options tab (beside the Public tab at the top of the Chat window). A window will appear with a list of participant names.
- Select the individual’s name and a separate chat window will open. The font size can be changed by clicking on the Options tab
Student Support and Best Practices
- Encourage users to connect with Chrome or Firefox browsers
- Encourage users to use a headset and microphone, not their laptop/computer microphone
- Open the session early
- Send participants directions and reminders ahead of time
- Request input for the session agenda from students
- Review the session layout with participants, reminding them that they can chat or raise a hand to ask questions
- Create an opening slide with set up instructions
- Have participants introduce themselves
- Use polling and emoticons to keep students engaged