Chat rooms allow participants to have an online text-based discussion on the cuLearn course page. Only the instructor or the TA can create a chat room for the students to use in the course. A chat room may have only one session or multiple ones that repeat at the same time and day each week. A course may have more than one chat room set for different times and days of the week. Chat is different from a Forum in that it takes place in real time (synchronous). It is especially beneficial when users are unable to meet face to face and for online activities including the following: ![]()
- Each group of students working together on an assignment can have its own chat room
- The instructor or TA can conduct online office hours even if they are off campus
- Regular meetings of distance learning students to share experiences with others in the same course but in a different location
- A question and answer session with an invited speaker in a different location
- Tutorial sessions to help students review and prepare for exams
 To create a chat session:
- Click Turn editing on (button in the top right corner of your course page).
- Navigate to the week or topic section you wish the chat to appear in.
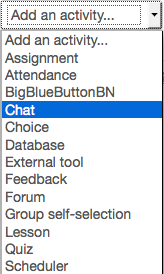
- Select Chat from the Add an activity drop down menu.
- Enter the Name of this chat room and Description of the forum. This description will be displayed at the top of the chat room.
- Checking Display description on course page will display the course Description on your course homepage just below the chat room link.
- Set the Next chat time for the first chat session. Times set for each chat room create entries in the course calendar to remind participants to log in for group chat at those times. Otherwise, the chat room always remains open to students. Chat sessions are saved and can be viewed at a later time.
- Select the option for Repeat sessions if you will have weekly sessions. Otherwise, choose “No repeats.”
- Everyone can view past sessions: by default, only instructors can view chat logs, though you can change this to “yes” if you would like all participants to view them.
- Click Save and Display, otherwise your changes will be lost.
- The Chat icon (bubble) will now appear on your main course page with the Name you typed in.